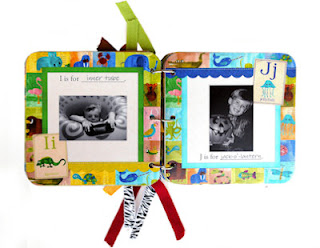
Make a colorful alphabet book using your child's photos, KB and Friends' Animals A to Z digital scrapbook kit and chipboard.
This adorable mini album is a hybrid scrapbooking project, meaning that it is a combination of digital scrapbooking and traditional scrapbooking. This personalized animal alphabet book is easy and can be completed in an afternoon.
Materials:
26 photos, each one representing a letter in the alphabet
KB and Friends' Animals A to Z printable digital scrapbook kit
14 pieces of 6" by 6" chipboard
3 one-inch book rings
Several colorful ribbons, cut in 8" lengths
Home printer (or, if you'd like, you may have your layouts printed at a copy center or photo finisher)
Matte photo paper (if printing your layouts at home)
Sandpaper
Hole punch
Scissors
Spray adhesive, acid free
Optional: chipboard ABC shape and ball chain
Begin making your alphabet book by choosing 26 photos that represent each letter of the alphabet. Your final mini album will be 6" by 6" in size, so these photos should be cropped to approximately 3" by 4".
Our printable, digital kit includes 26 inside pages, two title pages to choose from, an inside cover page and two outside cover pages.
If you are a digital scrapbooker, you can use your photo-editing program to simply drop the photos onto the pages and resize them. You can then add your own text digitally where it says A is for _________, B is for _________, and so on.
For those of you who are paper scrapbookers, making the 26 scrapbook pages and covers of your book is a breeze with KB and Friends' ready-to-print pages. Just print out the pages on matte photo paper (or have them printed at a copy center or a photo finishing store). You'll likely have to trim the white sides of your photo paper so that you have just the printed pages, measuring 6" by 6" each.
Use the adhesive spray to glue the prints onto the 6" by 6" chipboard pieces, making sure that you keep the layouts in the correct order when gluing to the back side of the chipboard. Use the spray adhesive in a well ventilated area. Be careful not to get any adhesive on the front of your prints.
After the adhesive has dried, you may have a trim any excess from the prints so that the printed image fits the chipboard perfectly. Our chipboard had rounded corners, so we used scissors to round the corners of the prints.
Use a hole punch to punch three holes on the left side of your chipboard pages for the binding for your ABC book. Make sure that you punch the correct side of each chipboard page. You need a sturdy hole punch and plenty of pressure to punch through the chipboard.
Thread the book rings through the punch holes to hold your book together.
Dress up your book by tying the 8" pieces of ribbon to the book rings.
To embellish your book even more, purchase a piece of chipboard in the shape of the letters ABC and a ball chain from a scrapbook store.
This last embellishment is optional. Purchase a chipboard embellishment already cut in an ABC shape (or another suitable shape). Print an extra inside page or cover page, then glued it to the both sides of the chipboard embellishment. Trim to fit. Use a ball chain to attach it to your alphabet book.


